As we were tidying gift-wrapping paper at the end of a family gathering over the festive period, my mum asked me if I wanted to keep a large piece of leftover and discarded cardboard for crafting with later… I was more than happy to keep the cardboard and add it to my not-so-tiny stash back at home 😊 Cardboard is definitely one of the handy re-useable materials that I always try to salvage and keep around for turning into something else at another time, if I can (I’ve had to become increasingly inventive as time has gone on, to find places to keep the extra bits of cardboard!).
Sparking Imagination
One of the reasons I think cardboard is such a wonderful material to keep is that it really is great for developing and encouraging imagination in the sense that it is a natural material, and is a bit like starting with a blank page of paper – there are so many possibilities, and with cardboard perhaps even more than the blank page as it lends itself even more to working in 3-dimensions due to its strength and durability. Sometimes there is the seed of an idea for a craft project, and recycled cardboard is the perfect material of choice for implementing the idea. But it’s also really great to use plain cardboard as the starting point for an idea too. I find that so many ideas can spring from the starting point of a freshly acquired piece of cardboard (either 3d assembled card – e.g. boxes of all sizes, or a flat piece of salvaged card) – by wondering ‘what else could this become’? When I catch myself tidying away empty boxes and beginning to daydream, it feels both very playful – trying to catch a spark of something possible – and also like a bit of a logic challenge – what would work? What would hold together well, what other materials will I need and so on… it can spark a bit of curiosity as well as imagination 😊.
Spontaneous Creativity
We’ve made all-sorts of cardboard creations over the years, often without much planning and just taking the idea from a plain cardboard box. One of the earliest things I remember making when the children were very small was a ‘giant spaceship’ for them to play in – essentially it was a big cardboard box (and therefore ‘giant’ to them) lined with tin foil and multicoloured chocolate wrappers glued on for the buttons and panels and the flaps of the box the ‘wings’ of the spacecraft. It was really a very simple project and very rough & ready but so fun that the spaceship idea came from sitting in a box and then became incorporated into imaginary play for a long while afterwards. In the same way that cardboard boxes are infinitely intriguing to playful kitties, empty boxes can become all-sorts of other entities for young children – from trains and cars, castles, hideaways in a game of ‘hide & seek’ to spaceships that can travel to the dark side of the moon and back 😊
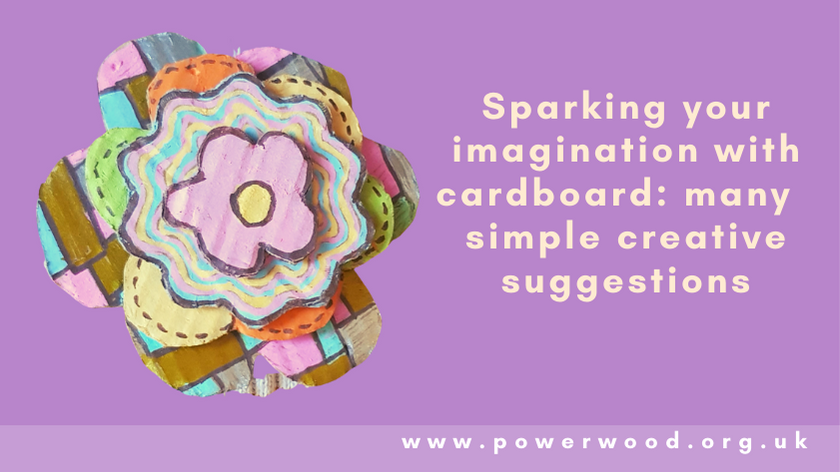
Cardboard boxes are also great for smaller-scale projects like diarahamas, or any kind of miniature scene in a box. And of course, you can cut cardboard up and incorporate into so many different craft activities from hanging decorations, to 3d pop-up collage. By early December last year, a fair bit of cardboard was already flowing into our house, and we set about using some of it for our craft activities straight away. With so much else going on at that time of year we wanted something very simple to make so we came up with the idea of these beautiful 3d colourful badges (see pic), using layers of cut-out recycled card paints, acrylic paint pens, some hot-glue and a brooch pin. They were so simple to make and since the main part of the craft was decorating the shapes with paint pens, it was relaxing too. The results were very beautiful and sturdy enough to wear as well, since they were made from cardboard and reinforced with hot-glue.

A few ideas for recycled cardboard crafts:
Many of these we have made ourselves over the years so can vouch for them as fun craft projects – but also for their durability! We still have quite a few of our cardboard creations dotted around our home that have really stood the test of time, both in terms of being out on display but also wear & tear and imaginary play-mileage 😊
Miniature scene in a box or even a whole dolls house – tiny boxes can be just as useful to keep and re-use as large ones! You could make miniature items for a scene in a small box using a material such as polymer clay. You could even combine a number of different boxes of varying sizes for rooms of an entire dolls house. You could extend the project of a dolls house by making your own items to go inside either from air-dry clay or polymer clay.
Badges (as mentioned above) – combine cardboard shapes with acrylic paint or paint pens, hot-glue, and a brooch pin to make beautiful, sturdy 3d hand-made badges or brooches to gift to friends, pop on your favourite bag, or use for imaginary play. Make any shapes or designs that you like! Layering with 3 to 4 shapes/designs with hot-glue in between each shape will make your brooch strong and durable.
Picture Frames – especially great for children’s art, which can sometimes be quite prolific! There can be quite a few children’s creations that you want to keep, and highlight, by framing them. Making your own frames out of recycled cardboard can be an extra-art activity in and of itself, as well as being a cost-effective way of treasuring your family creations. You could even make these cute-corner frames with some thinner pieces of recycled cardboard -e.g. the card from cereal boxes.
Crowns/decorations for crowns – cut out and decorate all kinds of shapes to add to a crown-base for imaginary play and seasonal celebrations. You could make flowers, leaves, stars, animal ears, or even abstract shapes of your own design.
3d Forest or other imaginary scene – cut out shapes such as trees, flowers, toadstools, mushrooms, make a slit in the base/at the bottom of your shape. Cut a small semi-circle of cardboard to pop into the slit, giving you a base to stand your shape up. You could make any kind of scene you like and incorporate into imaginary play, or make a beautiful scene on a bedroom shelf!
3D Animals – similar to the above idea – cut out animal shapes and the various body parts, with slits in adjoining pieces to slot together for a 3d effect. These can be incorporated into imaginary play, or made to reflect a certain passion at a certain age/phase – e.g. dinosaurs, or farm-yard animals.
Masks – human faces, creatures, animals, or abstract mask designs – there are so many possibilities. If you want to make a more 3d effect, use recycled cardboard as your base and build up features with paper-mache. But simple 2-d masks can still be very creative, imaginative and striking!
Wings – perfect for dressing-up, imaginary play and school plays/performances of any kind. Very simple angel wings can be made by covering wing shaped card-board in some faux-fur fabric, or you could make fairy or butterfly-style wings by cutting out shapes within the main wing to create a ‘stained glass window’ effect with tissue paper.
Buildings & play-inside constructions of all kinds – castles, spaceships, towers, tipis, dens… these really don’t have to be complicated or grand, especially since young children can often easily turn everyday things into something else in their own imagination. Simple play-inside constructions are also great for outside play in the summer months.
Lightbox scene (or miniature theatre & shadow puppets) – use a recycled box to make a ‘shadow theatre’ effect lightbox by cutting shapes into sides of the box, sealing with some baking paper and putting silhouette shapes and some small battery powered lighting inside. You could also extend this idea to make a shadow theatre as in this tutorial, or make a miniature scene in a box and turn it into a nightlight like this.
Hanging signs – combine a piece of recycled cardboard with hot-glue writing, and decorate with tissue paper, PVA & water to make a beautiful hanging sign for your home or office space – this tutorial explains how.
Free-range drawing board – there was a time when our young children were rather fond of drawing on the walls – or indeed any surface – of the house! If ever particularly large boxes would enter the house, I would sometimes cut large-ish boards out of them and offer them as a large expansive surface to draw freely on. And if you wanted to take this idea a bit further, you could paint a large piece of cardboard with chalkboard paint and invest in some chalks or chalk-pens to create a large DIY chalk-board to use over and over again.

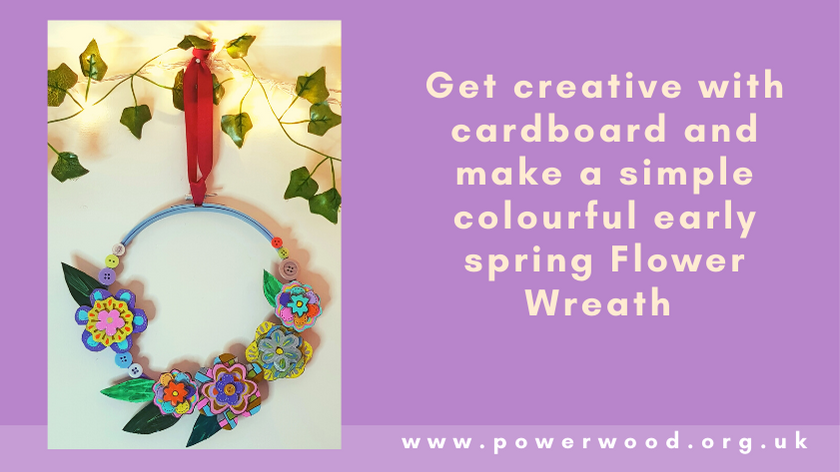
Hanging decorations & hanging seasonal wreaths (all seasons) – use cardboard as the base for various hanging decorations including wreaths as household ornaments for seasonal celebrations. You could make small decorations by cutting a simple shape e.g. a heart, and layering up with news-paper & paper-mache to make the shape 3d. Paint or decopatch in beautiful colours once dry. Or, use recycled cardboard to make flowers (and/or a base) for a hand-made seasonal wreath. I’ve based the craft idea accompanying this post on the recycled cardboard theme and it can be found here.
These are really only a few ideas of things to make from recycled cardboard, which in the age of home delivery, is often abundantly available, and a great material to re-use creatively. There are plenty of household items that can be saved and upcycled (lots of ideas here), but if storage space is limited and you have to choose, a few salvaged pieces of cardboard will go a long way, both because it is versatile and durable, and usually combines well with other materials (paints, glues, tapes etc). You can also leave creations undecorated and in their minimal plain cardboard colour – for example if you’ve made some 3d animals – leaving room for even more imagination to playfully fill-in the blanks… Wishing you plenty of creative days with this easily found and repurposed material!
© 2022 Abigail Cole
For more creative ideas visit www.forgetfulfairyartstudio.com
Help us to continue support to all neurodiverse families and individuals
PowerWood offers to neurodiverse families understanding, simple tools and strategies that enable us to support ourselves and our children through emotional overwhelm. If you enjoy reading the articles please support PowerWood making all information available to all by becoming a PowerWood Community FreeBee or Friend member. Thank YOU!

